
The windmill exercise, often performed with a dumbbell or kettlebell, is a fantastic movement for building overall strength and coordination. This guide will break down how to perform the windmill exercise correctly, transforming it into a powerful tool for your fitness journey.
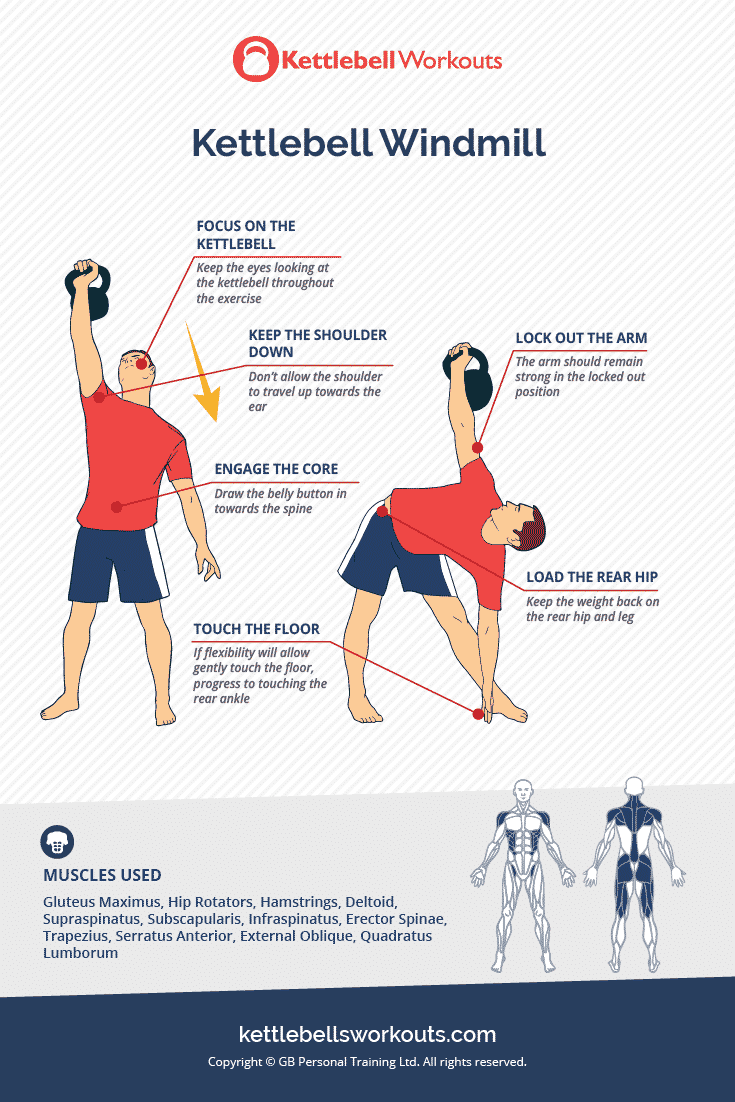
Image Source: kettlebellsworkouts.com
What is the Windmill Exercise?
The windmill exercise is a functional fitness movement that mimics the natural motion of a windmill. It involves hinging at the hips and bending at the knees while keeping the torso relatively upright, reaching towards the floor with one hand while the other hand points towards the sky. It targets many muscle groups simultaneously, making it an excellent full body workout.
Benefits of the Windmill Exercise
The windmill exercise offers a wide array of advantages for people of all fitness levels. It’s not just about lifting weights; it’s about building a resilient and capable body.
Core Strength and Stability
One of the primary benefits of the windmill exercise is its ability to significantly improve core strength. As you hinge and reach, your abdominal muscles, obliques, and lower back work intensely to stabilize your spine. This creates a strong, robust core, essential for preventing injuries and improving athletic performance. A strong core acts as a foundation for almost every movement you make.
Hip Mobility and Flexibility
This exercise is also a champion for hip mobility. The deep hinge pattern and the stretch through the hamstrings and hips enhance flexibility. Improved hip mobility can alleviate lower back pain, improve posture, and unlock greater range of motion in other exercises and daily activities. Tight hips can be a limiting factor in many strength movements, and the windmill helps to loosen them up.
Shoulder Health and Stability
When performed with a weight, the kettlebell windmill or dumbbell windmill greatly enhances shoulder stability. The overhead arm maintains a stable position while the body moves beneath it. This strengthens the rotator cuff muscles and the muscles surrounding the shoulder joint, contributing to better shoulder health and reducing the risk of injury. It teaches your shoulder to be strong and stable in various positions.
Posterior Chain Development
The windmill exercise effectively engages the posterior chain, which includes the hamstrings, glutes, and lower back. The hip hinge motion is a key driver for strengthening these crucial muscles. A strong posterior chain is vital for powerful movements like lifting, jumping, and running, and contributes to good posture.
Rotational Strength
While not a purely rotational movement, the windmill does promote rotational strength in the trunk and hips. As you control the descent and ascent, your core muscles engage to resist unwanted rotation, thereby strengthening your ability to control and generate rotational force. This is beneficial for sports like golf, tennis, and baseball.
Balance and Coordination
As you practice the windmill, you’ll notice an improvement in your overall balance and coordination. The need to control the weight and maintain a stable torso while moving through a large range of motion trains your neuromuscular system to work more efficiently. This can translate to better performance in everyday tasks and athletic endeavors.
How to Perform the Windmill Exercise Correctly: A Step-by-Step Guide
Let’s break down the windmill exercise, ensuring you execute it with proper form to maximize its benefits and minimize the risk of injury. We’ll cover both dumbbell and kettlebell variations.
Preparation is Key: Setting the Foundation
Before you even pick up a weight, proper setup is crucial.
- Stance: Stand with your feet about shoulder-width apart, or slightly wider. Your toes should be pointing straight ahead, or slightly outward if that feels more natural for your hip structure.
- Weight Placement: If using a dumbbell, hold it in one hand. If using a kettlebell, hold it in the same hand. The weight will be held overhead.
- Core Engagement: Before initiating the movement, brace your core. Imagine someone is about to punch you in the stomach – that’s the tension you want. This will protect your spine.
- Shoulder Alignment: Ensure your shoulder blade is packed down and back. Avoid letting your shoulder shrug up towards your ear.
The Movement: Step-by-Step Breakdown
We’ll use the example of performing the windmill with your right hand raised.
Step 1: The Setup
- Stand tall with your feet about shoulder-width apart.
- Hold a dumbbell or kettlebell in your right hand, pressing it straight up overhead. Keep your arm locked out but not hyperextended.
- Your left arm can hang loosely by your side or be placed on your hip for balance.
- Turn your feet slightly outward, about 10-20 degrees, so your right foot points forward and your left foot is turned slightly inward. This subtle adjustment helps with hip rotation and allows for a deeper hinge.
Step 2: The Hinge and Reach
- Keeping your right arm locked and the weight stable overhead, begin to hinge at your hips.
- Imagine you are trying to push your hips back and slide your torso down your inner thigh.
- Simultaneously, begin to slide your left hand down the outside of your left leg. Keep your left leg relatively straight but not locked out. A slight bend in the knee is okay.
- The key here is to maintain a flat back. Your torso should move as one unit, pivoting at the hips. Don’t round your back to reach further.
Step 3: The Descent
- Continue to hinge and reach your left hand down your leg.
- Allow your gaze to follow the weight overhead. This helps maintain your balance and encourages thoracic extension.
- The goal is to get your torso as close to parallel with the floor as possible, or as far as your hip mobility and hamstring flexibility allow, while keeping your back flat and your right arm extended.
- Your left hand can rest on your shin, ankle, or the floor, depending on your flexibility.
Step 4: The Ascent and Return
- To return to the starting position, drive through your hips and glutes.
- Engage your core and glutes to pull your torso back upright.
- Imagine you are closing a car door with your hips.
- Keep the weight overhead and stable throughout the movement.
- Your left hand can assist by pushing off your leg as you rise.
- Return to the fully upright starting position with control.
Step 5: Repetition and Switching Sides
- Complete the desired number of repetitions on one side before switching to the other.
- When switching sides, carefully lower the weight to the floor or to your shoulder, then stand up. Then, press the weight overhead with your other arm and repeat the entire sequence.
Important Form Cues and Common Mistakes to Avoid
- Don’t Round Your Back: This is the most critical cue. Your back should remain straight and stable throughout the entire movement. Think of your torso as a solid block.
- Don’t Bend the Overhead Arm: Keep your arm locked out, but not hyperextended. The shoulder should be actively engaged to keep the weight stable.
- Control the Movement: Avoid using momentum to swing the weight. The windmill is a controlled, deliberate exercise.
- Hip Hinge, Not Squat: Focus on hinging at the hips, pushing your glutes back, rather than bending deeply at the knees like a squat.
- Don’t Let the Weight Pull You: The weight is an addition to the movement, not the driver. Your body’s mechanics should lead the exercise.
- Listen to Your Body: If you feel any sharp pain, stop the exercise immediately.
Variations of the Windmill Exercise
Once you’ve mastered the basic windmill, you can explore variations to challenge yourself further and target muscles in slightly different ways.
Kettlebell Windmill
The kettlebell windmill is arguably the most popular variation. The offset nature of the kettlebell’s weight distribution can make it slightly more challenging for grip and shoulder stability, further enhancing its benefits.
- Grip: The kettlebell handle provides a different grip than a dumbbell. Ensure a secure grip, with the kettlebell handle resting across your palm and fingers.
- Kettlebell Exercise Benefits: As a kettlebell exercise, it naturally promotes grip strength and reinforces the challenge to your shoulder stabilization muscles due to the weight’s center of gravity.
Dumbbell Windmill
The dumbbell windmill is a great starting point if you’re new to overhead carries and unilateral loading.
- Grip: A dumbbell offers a more neutral grip, which can feel more comfortable for some individuals.
- Dumbbell Exercise Benefits: It still provides significant benefits for core strength, shoulder stability, and hip mobility.
Unweighted Windmill (Bodyweight Windmill)
Before adding weight, practice the windmill movement without any external load. This is crucial for developing proper form and activating the correct muscles.
- Focus: Concentrate on the hip hinge, maintaining a flat back, and feeling the stretch in your hamstrings.
- Progression: Once you can perform 10-15 clean repetitions on each side without weight, you can consider adding a light dumbbell or kettlebell.
Other Variations for Advanced Practitioners
- Floor Windmill: This variation involves starting and ending the movement on the ground, often as part of a Turkish Get Up progression. It’s a more complex movement that integrates the windmill into a larger, full-body sequence.
- Cross-Body Windmill: For a more advanced challenge to rotational strength, you can try reaching the top arm across the body towards the opposite foot. This requires significantly more core control and mobility.
Integrating the Windmill into Your Workout Routine
The windmill exercise is a versatile movement that can be incorporated into various training styles.
As a Warm-up
Perform a few unweighted repetitions on each side before your main workout. This helps to activate your core, improve hip mobility, and prepare your shoulders for more demanding exercises.
As Part of a Circuit
Include the windmill in a circuit with other functional fitness exercises like squats, lunges, push-ups, and rows. This creates an efficient full body workout that enhances cardiovascular conditioning alongside strength.
-
Example Circuit:
- Kettlebell Swings (10 reps)
- Bodyweight Squats (15 reps)
- Dumbbell Windmill (8 reps per side)
- Push-ups (as many reps as possible)
- Plank (30-60 seconds)
Rest for 60-90 seconds between circuits and complete 3-4 rounds.
As a Finisher
After your main strength training, use the windmill with lighter weights for higher repetitions as a finisher. This can help to further challenge your core and shoulder endurance.
Incorporating into a Turkish Get Up
The windmill is a component of the Turkish Get Up, a complex but incredibly rewarding full-body exercise. Learning the windmill correctly is a foundational step in mastering the Turkish Get Up.
Safety and Progression
When embarking on the windmill exercise, safety and progressive overload are paramount.
Starting Weight
Begin with a very light weight – even a light dumbbell or a small kettlebell. The focus should be entirely on form and control.
Progression
Once you can comfortably complete 10-12 repetitions on each side with perfect form, you can gradually increase the weight. Aim for small increments.
Frequency
The windmill exercise can be performed 1-3 times per week, depending on your overall training volume and recovery.
Listen to Your Body
Never push through pain. If your shoulders, back, or hips feel strained, reduce the weight, decrease the range of motion, or take a rest day.
Frequently Asked Questions (FAQ)
Here are answers to some common questions about the windmill exercise.
Q1: What muscles does the windmill exercise work?
A1: The windmill exercise is a comprehensive movement that engages multiple muscle groups. It significantly targets your core strength (including obliques, abdominals, and lower back), improves hip mobility, strengthens the posterior chain (hamstrings, glutes), and enhances shoulder stability. It’s a true full body workout that also improves balance and coordination.
Q2: Can I do the windmill exercise without weights?
A2: Absolutely! Performing the windmill without weights is a highly recommended starting point. It allows you to focus on mastering the hip hinge, maintaining a flat back, and developing proper body control. Once you can perform 10-15 repetitions smoothly on each side, you can gradually introduce a light dumbbell or kettlebell.
Q3: How is the kettlebell windmill different from the dumbbell windmill?
A3: The kettlebell windmill often feels slightly different due to the weight’s center of gravity. The handle of a kettlebell is offset from the mass, which can demand more grip strength and a greater degree of shoulder stability to control the weight overhead. Both are excellent kettlebell exercises and dumbbell exercises that build similar foundational strength.
Q4: Is the windmill exercise good for beginners?
A4: Yes, but with a crucial caveat: beginners should start with the unweighted version to perfect their form. The emphasis on the hip hinge and core bracing is essential. Once the movement is solid, light weights can be introduced. It’s a more complex movement than a basic squat or deadlift, so patience with form is key.
Q5: What should I do if my back rounds during the windmill?
A5: If your back rounds, it means you’re likely hinging too much or too quickly, or the weight is too heavy. Reduce the range of motion, focus on keeping your spine neutral, and engage your core more actively. You might also need to work on hamstring flexibility. Consider doing the unweighted version or reducing the weight significantly.
Q6: How many reps and sets should I do?
A6: For strength and conditioning, 8-12 repetitions per side for 3-4 sets is a good starting point. If using it as a warm-up, 5-8 reps per side with lighter weight or no weight is sufficient. As a finisher, you might do higher reps (12-15) with lighter weight. Always prioritize form over quantity.
Q7: Can the windmill exercise help with lower back pain?
A7: Yes, it can. By strengthening the core strength and improving hip mobility, the windmill exercise can alleviate some types of lower back pain. However, if you have existing back pain, consult with a healthcare professional or physical therapist before attempting this exercise. Proper form is critical to avoid exacerbating pain.
Q8: How does the windmill relate to the Turkish Get Up?
A8: The windmill movement is a critical component of the Turkish Get Up. Specifically, the portion where you reach the weight overhead and hinge at the hips is very similar to certain phases of the TGU. Mastering the windmill builds the necessary shoulder stability, core strength, and hip mobility to perform the Turkish Get Up safely and effectively.
Q9: Can I do windmills daily?
A9: It’s generally not recommended to do strenuous windmills daily. Your muscles need time to recover and rebuild. Incorporating it 1-3 times a week, along with other varied exercises, will yield the best results for building strength and preventing overuse injuries.
Q10: What are some common mistakes to watch out for?
A10: Key mistakes include rounding the back, bending the overhead arm, using momentum instead of controlled movement, and performing a squat motion instead of a hip hinge. Always focus on maintaining a neutral spine and controlling the weight throughout the entire range of motion.
By following this comprehensive guide, you can confidently incorporate the windmill exercise into your training regimen and reap its many benefits for a stronger, more mobile, and more functional body.